
By Guest Writer @LukesGoldies
Choosing the right variety of goldfish to breed
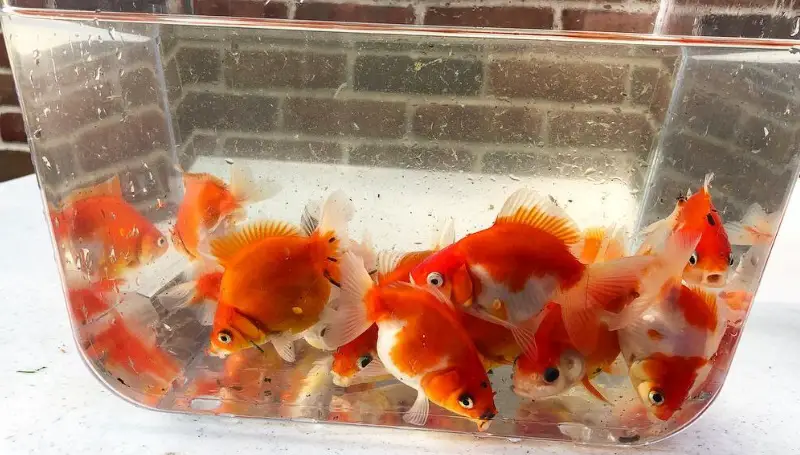
There are many different types of goldfish that can be chosen to breed, but only certain specific types are actually worth breeding on a small scale for profit. Some adult goldfish such as fantails may only sell for $10-15, but other goldfish such as Ranchu goldfish can typically go for $50-100 as mature adults and even climb as high as $250 a piece if they are grown large enough. Keeping this in mind, it is wise to only breed high end and high quality goldfish to get the most money from the least amount of fish. Goldfish that would fall into this category would be the Ryukin goldfish, high end Oranda goldfish, Pearlscale goldfish, Butterfly goldfish, Lionhead goldfish, and as I mentioned before, the Ranchu goldfish.
The Ranchu also seems to be one of the most popular fancy goldfish varieties and is gaining a lot more popularity very quickly, so I will be focusing mainly on breeding the ranchu goldfish, but the guidelines for breeding other goldfish of different varieties are nearly the exact same.
Hand-picking the best goldfish in that variety to breed:
When choosing which goldfish of your specified variety to breed, it is very important to choose the highest quality parent goldfish, so you’ll have high quality babies.
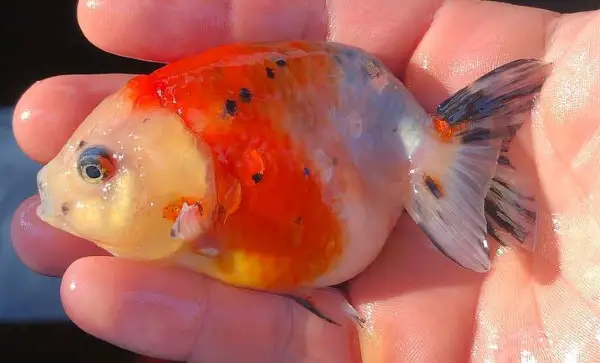
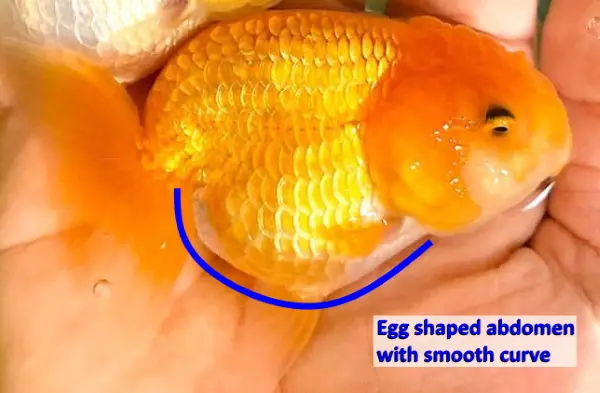
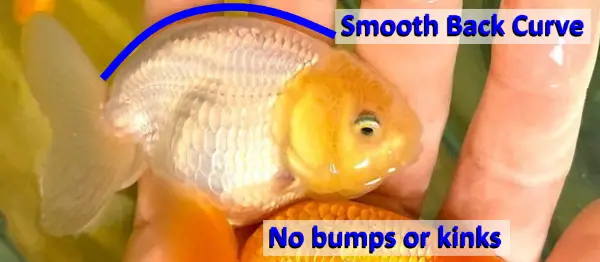
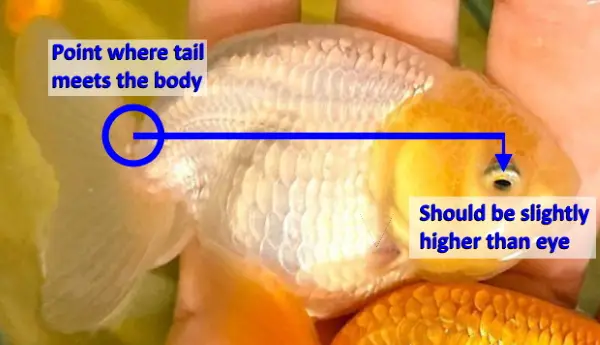
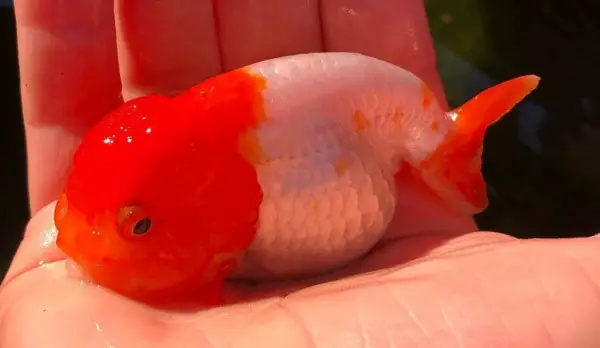
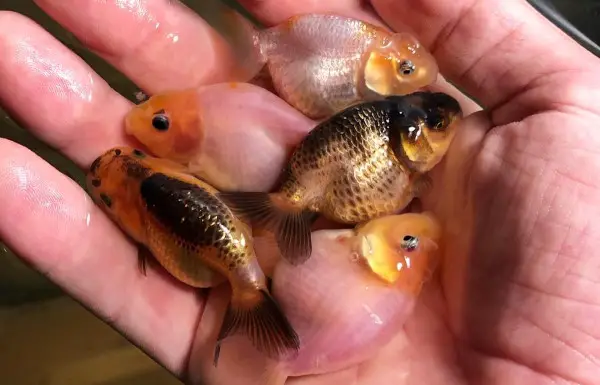
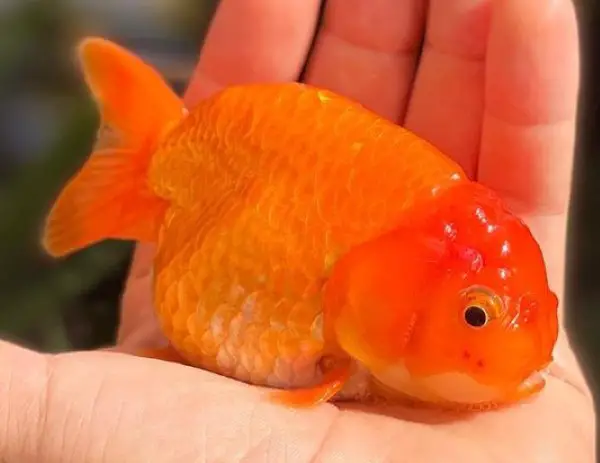
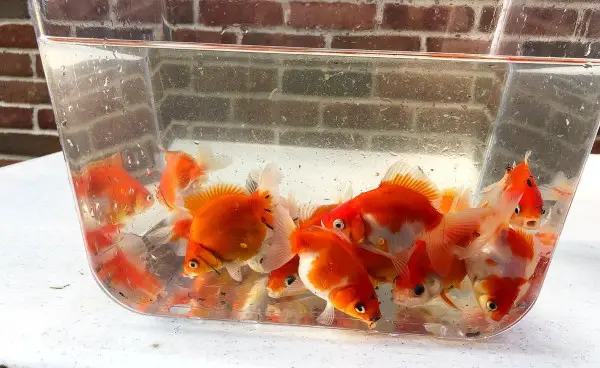
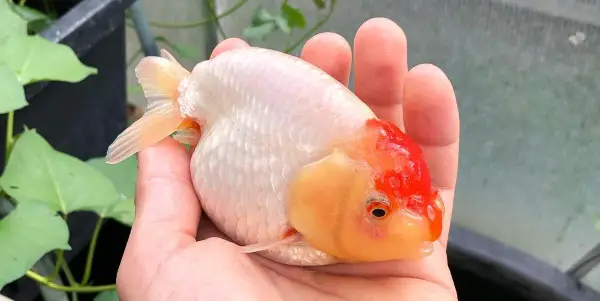
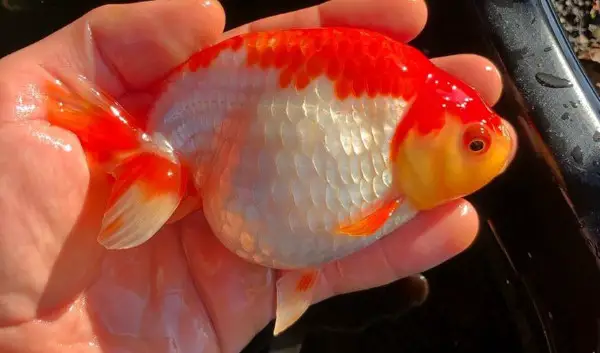
For the Ranchu goldfish, this means choosing parent goldfish that have smooth, rounded backs. It is important that the back of the goldfish has a nice side view curvature, without any kinks or deformities in the smooth curve of the spine. The head growth should be good sized and round, but not too much that it covers the eyes of the goldfish. The fins should be evenly split and symmetrical , along with the top view of the goldfish’s spine as well. Make sure all fins are present and that there are two anal fins, it is quite common for ranchu to only grow one anal fin, but parents that will produce high quality fry should both have two anal fins. It is also important to have the end of the tail that connects to the tail fins to be thick and strong. And of course, you should pick out a strong and active swimmer that does not have swim bladder disease or buoyancy issues, these may be carried by their genes to the baby goldfish fry. It is also smart to choose a goldfish that is fairly large to ensure that the baby goldfish will have the genes to grow into a large and expensive goldfish. Below are examples of what to look for and what to watch out for when choosing a high quality ranchu goldfish to breed:

Sexing the goldfish (determining whether the goldfish is male or female):
Sexing a goldfish can be very difficult to definitively sex because the physical differences in male and female goldfish are extremely small, and sometimes are not visible. One common way to tell the difference between a male and female goldfish is to look closely at the goldfish’s vent (anus), and look to see if you see it slightly protruding outward or slightly sunken inward. Females will generally have their vents protruding outward while males may typically have them be more sunken inward or flat. Though this method of sexing goldfish can work, it is not always 100% true. The only true way to tell for sure if a goldfish is a male or female it to push closely on their vent during mating season and see if either eggs or sperm come out. If a milky white fluid comes out, its a male, and if eggs come out, it is a female. The problem with this method is that goldfish will only release these at certain times in the mating season and you will not be able to do this when you are out trying to purchase one. So it is smart to buy multiple quality goldfish with the hope that you have at least one female and at least one male.
Quarantining the new goldfish:
When getting new goldfish, it is always smart to quarantine them in their own tank in case they have any forgeign diseases they brought with them. After leaving them in their own tank, separate from any other fish you own for at least 2-3 weeks, it is usually safe to add them with other fish after this time period. If they show signs of any diseases, keep them quarantine and research to symptoms and how or if they can be cured.
Simulating a cold season or winter:
To get goldfish to breed, you must fool them into thinking it is breeding season. Breeding season for goldfish is generally in the spring-time as the cold water from winter, warms up and gradually goes from a cold temperature to a warmer temperature. So to simulate this transition, you must fool the goldfish into thinking it is winter or a cold season for around 1-2 weeks.

During this two week period, you want to make the tank as cold as possible, this can mean putting it in a shady area, putting fans over the top of the water, or even filling bags up with ice packs and ice cubes and floating them on the top of the tank to cool down the water temperature. I find that bags full of ice bags can be pretty effective at cooling down an aquarium with goldfish in it. The target temperature you should shoot for is a water temperature of around 45-60 degrees (Fahrenheit) if possible, the closer to 45, the better. In addition to cooling the water down you should also try to make the tank have less light exposure and keep the lights off for a longer portion of the day to simulate the shorter days of the winter. Feeding should also be kept to a minimum to again simulate the scarce eating of food during the winter months. These three changes should be enough to fool the goldfish’s body into thinking it is a colder season. In the next step, you will reverse these changes to the exact opposite to fool the goldfish into thinking it is spring and time to breed!
Simulating the transition to spring/summer:
Now that you have fooled the goldfish into thinking it is winter, it is time to slowly transition that simulated winter, into a simulated spring. This means that after two weeks of low light, low temperatures, and low feeding, you will slowly increase all three of these categories to simulate the transition to spring.
The transition from cold winter water, to hot spring water should also take around 2 weeks as well. During these two weeks you will slowly increase the temperature slightly everyday, slowly increase the amount of light the goldfish are exposed to, as well as increase their feeding, and increase the variety of their food. The temperature should start at maybe around 50 degrees (Fahrenheit), as it was for the two weeks prior, then over the course of the two week transition, be raised up to around 80-82 degrees (Fahrenheit), this can be done with an electric water heater. You should also be slowly beginning to feed them more, and feed them a wide variety of veggies, live food, frozen food, and other foods that would bring diversity into their diet, this also simulates the additional food options that come with spring. And also increase the amount of light they are exposed to (around 16-18 hours a day). After you slowly transition to this phase of high and diverse feeding, high water temperatures, and high light exposure, you will keep the fish in this phase of simulated spring/ summer until they begin spawning.
Waiting for spawning to begin:
After you have slowly transitioned the simulation from winter to spring, you will simply have to wait for the goldfish’s natural instincts to kick in and for spawning to happen. During this time of waiting you must still keep the temperature high at around 80-82 degrees (fahrenheit), feeding to maximum and light on for long periods of the day. If the goldfish still do not start to spawn after a week or two, add live plants or decorations of fake plants, this may help them feel as if it is more like springtime.
When the time comes and the fish really do start to spawn, you will only know if you wake up very early every morning just as the sun is rising and check the tanks to see if the males are chasing the females around the tank, if the male fish are chasing the female fish, then they are ready to spawn. They will only spawn in the early- mid morning time, so it is important to be awake at this time every day so you can intercept the female goldfish before they release their eggs. And after this first spawn, if you keep the tank conditions the same, the goldfish should continue to spawn weekly, maybe even more often depending on the goldfish, so if you want multiple spawns from one season, keep the tank conditions the same and continue to wait for more and more spawns throughout your simulated “season”. Throughout this process keep in mind that increased feeding and increased temperature in the tank will cause the water to spoil much faster and the goldfish need very clean water to begin spawning. If the water quality remains poor, then they will not spawn. So remember to have a strong filter that aerates the water well as well as doing very frequent- high volume water changes, to keep the nitrates as low as possible and water as clean as possible for the fish.
Choosing your preferred method of egg capture and fertilization:
Now that the goldfish have begun to spawn, you can choose one of two ways to capture and fertilize the eggs, there is the natural way with spawning nets, or the hand spawning method, or what I like to call, the “bucket capture” method.
I will focus on the “bucket capture” method because I find it more effective and easier than using spawning nets. In this method, you fill up a five gallon bucket with only about 5 inches of tank water and place the female goldfish that is being chased by the males, and the male in the bucket. You could even choose multiple males if you would like multiple fathers. After you choose the female that is being chased and the preferred male fathers, you are ready to spawn. Begin by holding the female and lightly pressing just below the vent (anus) of the female goldfish as well as other areas around the belly and anus of the fish to gently push out the eggs she is holding. If these eggs do not come out from gentle and non-forceful pressure, then the female is not ready for spawning, if they do come out relatively easily, then you can continue until she is nearly empty of all eggs, her belly may seem quite deflated after doing this. While spawning her, be sure to keep her underwater, and move her around constantly as you expel the eggs, so the eggs do not clump up at the bottom of the bucket. The more spread out the eggs are when they land, the better the hatch rate will be. You have to move the female around as you expel the eggs because once the eggs touch somewhere, they stick and will die if you try to move them around. Once the eggs are all expelled from the female, you can return her to the tank and begin expelling the milt from the male. You will expel the milt from the male in almost the same exact way as you expelled the eggs from the female. You will lightly push at the male’s vent multiple times until a stream of white fluid is expelled from the vent (this is the sperm). You will do this multiple times until the male is nearly empty of all his milt. After the male releases his sperm in the bucket, you can return him to the tank and swirl the water in the bucket around to evenly distribute the sperm to all the spread out eggs at the bottom of the bucket. The eggs must now be fertilized by the sperm so it is good to set the bucket aside for about 30-45 minutes to allow for fertilization. Having only 5 inches of water and all the males milt in that small quantity of water should make the sperm concentration very high and allow for a high fertilization rate of the eggs. After 30-45 minutes, you can pour out most, but not all, of this sperm filled water, and fill up the bucket with about 12 inches of cleaner water, from the fish tank. This will help prevent fungus from spreading as the sperm water ages. Do not use fresh water yet, it may shock and kill the new eggs, use tank water even though it is not quite as clean, it is better for the eggs. After this water exchange is done, you will need to add methylene blue to the bucket to again prevent fungus from attacking the eggs. The recommended amount of methylene blue you should add should be online or on the bottle of methylene blue you buy. It can be bought at any aquarium store or online at amazon. After you add the methylene blue, you will need to add an airstone connected to an air pump, to the bucket of eggs, and leave it be until the next day. You can also look up a lot of videos on youtube that show exactly how this process should be done to safely hand-spawn your goldfish.
Keeping the eggs healthy until hatching:
These eggs should be kept at around 80 degrees (fahrenheit) and with an airstone in the water over the course of the incubation period. The eggs will likely take about 3 days to hatch, but will require work to keep the water clean and the eggs disease free over these three days. The first day after fertilization, the bucket should have at least two, 80% water changes done, one in the morning and one in the evening. These water changes can now be done with fresh water because the eggs are now more established and more tolerant to shock. This should be done every day until the goldfish hatch. When changing the water, it is important to replace the water with water at the exact same temperature as the water in the eggs, or you may shock the eggs and kill them. It is also important to obviously use water conditioner as you would with any normal water change, and to add methylene blue back into the water, everytime you change it.
This constant water changing and addition of fresh methylene blue everytime you change the water will ensure that fungus does not kill your eggs and your yield of goldfish fry is high. The last time I did this I had well over one-thousand goldfish fry hatch from that batch.
Hatching of the goldfish babies (fry):
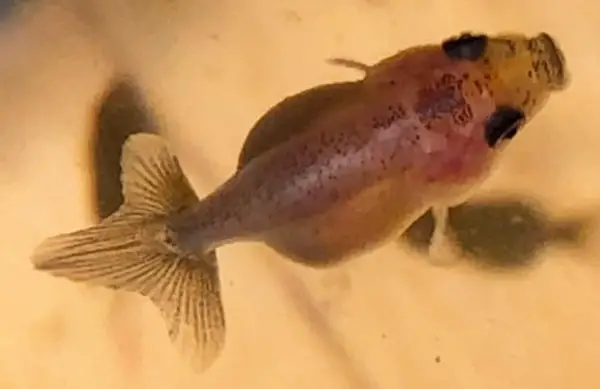
When the goldfish begin to hatch, they will look like little hairs with two small dots (their eyes) on the end. During the first 3 days after hatching, you will want to continue to change out large volumes of water once a day without removing the fish, which will be pretty difficult as they are very small. You may also stop adding methylene blue after water changes once the fish exit the eggs. During these three days post hatching, the baby goldfish might look dead or sick because they will not be swimming and they will all be laying on the bottom of the bucket. This is completely normal and is not a reason to worry as all baby goldfish do this right after hatching. They are still attached to their yolk sack, and are still absorbing it, even though they have hatched from the egg. While they absorb their yolk sack, they remain on the floor, not yet free swimming, but will begin to start swimming once their yolk sac is absorbed and they become hungry for food. Do not feed them until they become free swimming, this will only pollute the water, they will not eat food until they are free swimming.
Preparing the food for the fry (brine shrimp):
Once the baby goldfish (fry) become free swimming, they must immediately be fed with live, freshly hatched, baby brine shrimp.
Feeding live, freshly hatched brine shrimp is the most highly recommended food source for newly hatched goldfish. Directions on how to hatch and feed brine shrimp to goldfish can be found all over the internet, but it is important to start brewing the brine shrimp cysts at least 36 hours before the fry become free swimming because the cysts take around 36 hours to fully hatch. These brine shrimp cysts can also be found for sale on amazon and all over the internet. It is smart to buy at least 3 weeks worth of cysts because that is the only thing the fry should eat for the first three weeks. You should also always have at least two brine shrimp hatcheries running at the same time so while one is undergoing it’s 36 hour incubation period, the other one is already hatched and ready to use. Using this method, you will have brine shrimp available at all times of the day, and you will make a new batch of brine shrimp every night which will not be used the next day, but the day after that.
Water parameters in fry tank:
It is extremely important to have the water be as clean as possible at all times. The cleaner the water is, the more fry will grow and thrive. If the water becomes even slightly less clean, their growth may be stunted forever, so it is very important, especially for young fry, to always have extremely clean water.
The first important step in this is making sure that as soon as the fry are big enough to be caught with a fine net, to collect them and move them into a bigger tank where they will be for the first four weeks of their life. When doing this transition be sure to use water that was already in the bucket as the water in the tank when you first transition them. This movement from bucket to tank can be very stressful and shocking for the fish if done incorrectly so using the same water from the bucket and filling the tank up with a few inches of that when first moving them will make sure the water is the exact same as before so no sudden shock will occur. After they have all been moved, you can fill up the rest of the tank with freshwater, but again be sure it is the exact same temperature as the tank water. As for water changes in the fry tank, I find that doing two water changes per day is sufficient in keeping the water very clean, one in the morning and one in the evening. For both of these water changes, I would recommend changing out 80-90% of the water. I would also recommend having a sponge, air pump powered, filter in the fry tank, to aerate and clean the water, but also because it does not create a current so strong that it would hurt the fry. If you put a different filter that is not air powered, it may create too strong of a current and may even suck up the little babies.
Air powered sponge filters should not create too much current, and do not have any risk of harming the small and delicate fry. In addition to clean water, the water should also remain at a warm temperature of 80 degrees fahrenheit (this can be done with a water heater) to encourage a fast metabolism and push faster growth. You should also take into consideration the depth of the water level you are keeping the fry in because this can have an impact on swim bladder development. The water depth should be no taller than 12 inches for the first 3 weeks after hatching and should only slightly increase over time after that.
How to feed the brine shrimp:
Because brine shrimp are attracted to light, they can be very easy to isolate and pour into the fry tank from the hatchery. You can simply take the bottle or container in which you have the brine shrimp hatching in, and put the bottom right next to a light bulb. This will allow them to settle down on the bottom of the container and isolate themselves in one spot near the lightbulb. After they have all settled down near one bottom area of the container, you can put your thumb over the end of a straw, place the straw into the hatchery at the bottom where the brine shrimp are together and release your thumb off the top of the straw to suck the group of brine shrimp into the straw, put your thumb back on the top of the straw, and release them over into the fry tank. You can do this multiple times throughout the day with the same hatchery, just make sure to not feed them all at once, but to spread the feedings out throughout the whole day. And be sure to unplug the air sponge filter for at least 30 minutes at each feeding throughout the day so the little brine shrimp do not all get sucked up by the filter. Unplugging the filter allows time for the fry to eat the brine shrimp as well as allow time for the brine to settle on the ground so they can stay there for the fry to snack on later. These fry should have around 5-6 feedings per day, enough so that the fry should always have at least some food available to them at all waking hours of the day.
Cleaning the bottom of fry tank:
It is smart to routinely clean the bottom of the fry tank as it will get dirty over time from food build-up and fish waste build up.
Simply using a rubber tube as a siphon will easily work to suck debris off the floor or the tank, just be sure to not suck up any fish while doing this cleaning. The baby fry can be curious and will try to swim near the tube, but if you knock on the tank a couple times as they go near, they should get scared away from the end of the tube. This cleaning will improve water quality and allow for even better and faster growth in the fry.
The first stage culling and fry disposal:
Culling is practice that is honestly quite sad, but necessary. Culling, in short, is humanly killing off the fish that do not match the desired traits in the goldfish you are breeding. This means any goldfish with swimming issues, malformed fins, crooked spines, or any other trait that is deemed not desired should be killed off as early as possible. The first fry that will need to be disposed of are the fry that do not develop swim bladders correctly. These will be easy to spot because they will not even be able to swim off the ground of the tank. They will have no swim bladder, and therefore will be unable to float in the water, so these ones can be spotted and siphoned out relatively soon after the fry become free swimming. Typically 3 days after the fry become free swimming, these fish can be identified and removed.
After these are removed, you will need to identify other fish with major and noticeable flaws such as highly crooked backs or sever swimming problems, and carefully remove them with a small net. You can use clove oil to humanely kill these fry by mixing clove oil in the water with the culled fry and wait around 10 minutes for the fry to die. Clove oil is an essential oil that is naturally toxic to fish, but it kills them without pain so it is best to use this to kill the fry in a humane way.
Continued feeding until week 3-4:
At around week three, you will want to begin to introduce other foods for the goldfish to eat so you can begin to wean them off of brine shrimp and onto other foods. This may include high quality fish flakes, frozen adult brine shrimp, frozen blood worms, or any other food edible to goldfish that is small enough to fit in their mouths. Frozen bloodworms and frozen adult brine shrimp are very good options, but many other foods work as well. Just be sure that you slowly introduce these new foods along with continuing to feed the live brine shrimp so they can slowly transition. Once it is week 4, you should be completely transitioned to new food sources and can stop feeding freshly hatched brine shrimp. The new foods you feed them should be very high in protein to encourage good growth and they should also be fed to the fry in very high volume, they should basically be fed anytime that there is no food in the tank for maximal growth. Just be sure to keep up with water changes because high food intake means water that gets dirty very quickly.
Continued culling of fry through week 6:
At around 6 weeks, you will likely have to again sort through all the fry and choose which ones are keepers and which ones you will have to cull.
It is best to wait until 6 weeks to choose the final line-up of the fish you will keep so you can really make sure you are choosing the best. At 6 weeks, the fry should be developed enough for you to see which ones have good traits and which ones don’t. Remember to look at how even the fins are, the smooth curve of the back, proper swimming habits, the straightness of the spine, and any other minor deformities that might lower their value. It is economically smart to only raise the highest quality fish so you don’t waste money raising lower quality fish that will not sell for as much money. Remember to again use clove oil in a separate container of water with the fish in it to humanely kill the fish so they can die in peace.
Upgrading tank size:
When the goldfish being to gain some size, it is smart to seperate them out into bigger tanks or even put them in small pond to give them more space to swim and a larger water volume that would not become dirty as often.
The larger the tank, generally the cleaner the water and the larger the space for the fish to move around and swim in, which are both factors that are necessary for a goldfish to grow quickly in. Keep in mind to not overcrowd your tanks as well, unless you are doing constant water changes to make up for it. And be sure to understand that even if the nitrate and ammonia levels are low in a goldfish tank, overcrowding and lack of water changes will still stunt and slow the growth of the goldfish forever. The science behind this fact is quite complicated, but in short, goldfish release hormones in the water that when in high concentrations, stunt their growth and the growth of other goldfish around them. This stunt to their growth is permanent and will not allow the goldfish to ever reach their full potential in size and beauty. The only way to prevent these levels of growth stunting hormones to reach high levels is to not overcrowd your tanks, or to constantly do water changes to ensure that these hormones are constantly flushed out and replaced with clean, hormone free water. So because of this, it is extremely important to always do your water changes when needed, especially if your tank is heavily overcrowded. It is also important to keep in mind that now that the fish are bigger, you make slowly over time, increase the height of the water dept to up to 1.5 feet if that would give the fish more water volume and space to swim. But again, make sure to make any changes in water height take place over multiple weeks so the sudden change in pressure does not stun the fish.
Finding and using a good “base food”:
Once the goldfish have reached around 6-8 weeks old, you will want to find a “base food” or a goldfish feed that will be the main foundation of your goldfish’s diet for the rest of its time before it is sold. This food will likely be in pellet form and will be easy to feed and won’t require refrigeration or a freezer.
Some brands of good pellets to use are Mizuho Feed, Azayaka Feed or Saki Hikari Pellets. All three of these brands have excellent quality pellets that will ensure fast and healthy growth of ranchu goldfish, or any goldfish. I personally recommend Mizuho Feed as a food source that really helps in quick and efficient color development and very quick and intense growth. When choosing your desired pellet food source, is important to make sure the pellets are high in protein with them being at least 45% protein by mass or more. It is also important that the ingredients show a lot of good natural ingredients and are low in fillers like wheat or corn meal. And because goldfish, especially ranchu goldfish, can be very susceptible to swim bladder issues, it is important to only feed sinking pellets because floating pellets can cause the goldfish to swallow air as they eat them which will cause them to develop swimming disorders in the long run. Once you find a good food that is high in protein, has good ingredients, and is a sinking pellet, you will be ready to buy your new “base food” to be the main part of your goldfish’s diet until adulthood.
Finding good dietary, supplemental food:
Along with a base food you choose for your goldfish, you will want to have several other supplementary foods that you feed your goldfish along with the base food from time to time to give the goldfish a larger variety in their diet. A highly varied diet can have a large impact on the growth and health of a goldfish in the long term. In the wild, goldfish eat a large variety of foods and if you’re keeping them as pets, giving them access to a large variety of food will help to fuel their growth.
Other supplemental foods could include the algae that grows on the bottom and sides of the tank, cooked vegetables like broccoli or spinach, de-shelled cooked peas, live foods such as adult brine shrimp, blood worms, or mosquito larvae, cooked kale or lettuce, and many other things. There are many lists online that list all the foods goldfish are able to eat, and as long as you can cut up the food small enough to fit in the mouth of the goldfish, they will generally eat it. These additional foods can be given to your goldfish multiple times per week or even more if you can do that.
How to humanely kill missed culls or goldfish with diseases or disorders:
Some goldfish may seem like they are good quality fish when they are very young, but end up showing undesirable traits as they grow up. These goldfish will most likely have to be killed in the same fashion, with clove oil, because they cannot be sold if they are low quality. It can be very sad to kill adult goldfish, but especially if they are very sick and pose a threat to other goldfish, they must be disposed of. Sick or disformed fish simply should not be sold to others because it is wrong, and it continues the survival of bad genes should not be present in the ranchu goldfish line. I know killing the fish may seem heartless, but if you do use clove oil, the fish slowly fall asleep and pass, similarly to how humans feel when they are put under anesthesia. The main goal in culling to make absolutely sure the fish never suffers, and killing a malformed fish can sometimes end the suffering it would endure from being abandoned or living with its severe deformities.
Continued fast and healthy growth until adulthood:
As the goldfish mature and being to fill up their adult bodies at around 8 weeks, it is important to closely monitor the four important factors that will determine how fast and healthy your juvenile goldfish will grow.
These factors are temperature, diet, water quality, and swimming space. As a general rule of thumb, higher temperatures (not exceeding 82 degrees fahrenheit) will result in significantly faster and more cost efficient growth. Cleaner water will also significantly improve growth rates and growth potential which is why it is so important to constantly change the water out in your goldfish ponds and tanks, especially when you are feeding them very intensity and rigorously, which is what you will do. As well as having frequent water changes performed, remember to always have the tank water well filtered or aerated in between water changes so the fish is always in the cleanest and most aerated water as possible. You can even construct your own pond or tank filter with simple materials such as a water pump and a bucket filled with filter media. The space the goldfish have to swim in will also play an important role in the development of good swimming patterns and muscle development in the fish over their lifetime, so the bigger the space they can swim in, the better development they will have. And lastly diet will have an extremely important role in keeping the growth rate high and efficient for the rest of their adult life. Be sure to always feed the goldfish very vigorously, which means feeding them up to 5 times a day, and always feeding them until they are full. This vigorous feeding will use up a lot of food quickly and quickly dirty the water, but will also quickly grow the goldfish. Remember that it is not only the volume of food that matters, but the quality and variety as stated before. If you keep these conditions as optimal as possible with clean water and plenty of food, the goldfish should grow very, very quickly and be big enough to sell in six months to a year, or even longer if you are planning on growing them very large to sell for more money. And if you find some goldfish that grow up to be very high quality fish, and are worthy of breeding, you can keep them and further breed them to create your own line of goldfish and start the cycle over again from step 5 in this list. Good luck and I hope this guide helps you become a successful goldfish breeder!
Extra things you may need to buy:
- Air pump with air stone
- Air pump powered filter
- Methylene blue solution
- Brine Shrimp cysts
- High protein goldfish feed
- Frozen brine shrimp and frozen blood worms
- Water conditioner (Dechlorinator)
- Smaller tank to raise fry from 0-4 weeks
About This Article
This article was written by @lukesgoldies check him out on Instagram. He is a talented goldfish breeder, focusing on producing quality ranchu goldfish. If you are lucky enough to live in Chicago, or are able travel to there, he offers fish for sale.
